Introduction 🗗
The objective is to create an AR app to visualize the molecular structure of transition metals to aid the students in Applied Science in exploring the concept of superimposability.
This project is a final year student project by Chan Wen Loong and Li Yuxuan, from Temasek Polytechnic (TP). The project is supervised by Lye Sau Lin. The project's client is Poh Nguk Lau from the School of Applied Science in TP.
⚠ Disclaimer
This project is under the Temasek Polytechnic domain. The source code, project files, and compiled builds will not be shared on this website although code snippets can be found for documentation purposes.
The tools developed for the project is owned by Portyl Studios and has been made open-source by Chan Wen Loong under the GNU GPLv3 licence.
⚠ Work in progress
The documentation for TM Visualization is still being tweaked! Although the changes will mostly be minor fixes, keep in mind that some information may be incomplete.
Downloads 🗗
The links on this website are the official downloads. Do not trust links from other sources unless they are officially endorsed.
⚠ Work in progress
This section is still a work in progress!
-
1
Scan AR Code
The AR Codes set in Unity should be automatically detected by the app when the phone's camera is pointed at the code. -
2
Targeter
The targeter ⛶ should be visible on the screen at all times. It will be tracked on the code in world space to show that the code is tracked, turning into a static UI element when no codes are detected. -
3
One-Finger Translate Gesture
Dragging one finger across the screen will control the model's translation. -
4
Two-Finger Rotate Gesture
Twisting two fingers on the screen will control the model's rotation. -
5
Mirror Image Button
Tapping the "Mirror Image" button will make another model visible and reset the original model to its starting position. The two controls listed above will be transferred to the new model and the old model can no longer be controlled. Tapping the button again will reverse its effects although it will not revert the original model's position. -
6
Guiding Questions Tab
Tapping the up arrow will expand the tab to fill the screen. The camera should remain on and tracking. The tab is scrollable. Tapping the down arrow will collapse the tab. -
7
Re-targeting
Losing track of the target code will reset the model to its original position and disable the mirror image.
Project Details 🗗
The main app was built in Unity Version 2019.3.3f1 targeting Android users. The tools we used are listed below.

Molecule Builder
Speeds up the process of modelling and texturing by automatically placing chemical bonds using a hierarchy system. Built in Cinema 4D using XPresso.
AR Code Generator
Generates slightly customisable AR Codes using a seed. Built in Cinema 4D using XPresso.
Vuforia
Runs most of the AR interaction for the project. One of the most popular Augmented Reality Platforms.
Lean Touch
Handles complicated touch inputs for the project. A free asset on the Unity store.
Script Controller
Connects the Vuforia library to the Lean Touch controller. A custom script coded in C#.
Cineware
Makes importing Cinema 4D files a simple drag and drop. A free asset on the Unity store.
Unity
Used as the development platform to build the app on.
Cinema 4D
Used in conjunction with the Molecule Builder to create all the models.
Illustrator
Used to do all the graphic design present in this project.
Case Study 🗗
We spent a few days learning the chemistry topics related to the project. Although this was not a requirement, we decided to learn it to better understand their struggles to grasp the concept.
The chemistry topic is called Geometric Isomerism. The pictures below are taken from two videos by The Organic Chemistry Tutor on Complex Ions, Ligands, & Coordination Compounds and Naming Coordination Compounds, which are the prerequisite topics to fully understand the concept of isomerism. It is considered fair use for educational purposes.
Complex Ions and Ligands
Transition metal ions form complex ions with ligands.

Structures
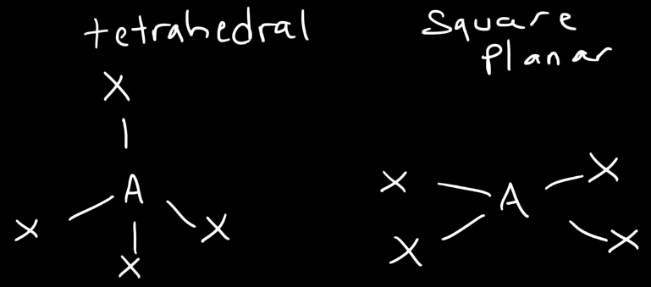
The coordination number in a molecule is the number of atoms, molecules or ions bonded to it. The 3 relevant structures are listed below.
Coordination # = 4
Tetrahedral, Square Planar
Coordination # = 6
Octahedral
Denticity
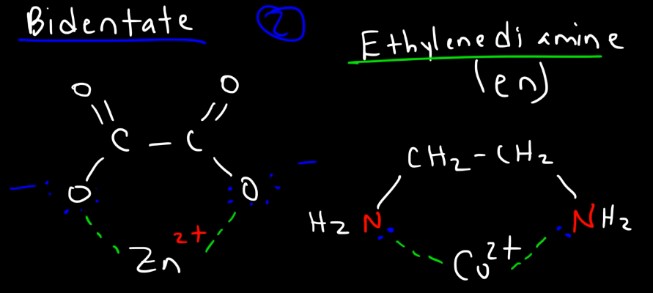
Denticity describes the number of interactions a ligand has with the transition metal ion. Monodentate refers to one bond, bidentate refers to two bonds.
Example: Ammonia based compounds [NH₃] is monodentate while oxalate [C₂O²⁻₄] and ethylenediamine [C₂H₄₂] based compounds are bidentate.
Coordination Compounds
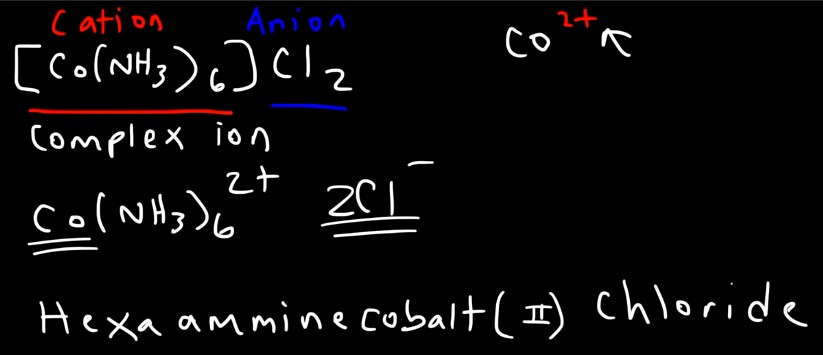
A coordination compound is a neutral compound that consists of a complex ion.
Isomerism
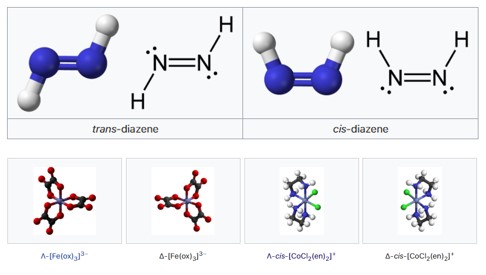
Optical isomerism occurs when a molecule is not superimposable with its mirror image.
Understanding other complex topics like cis-trans isomerism and octahedral propeller twist was not required and is omitted from this explanation.
Project Structure 🗗
Peek into the app's project folder to get a sense of the files and structure before looking at the detailed documentation for some of the more complicated parts.
- Cinema 4D -
contains all the models
- 01 MA2B2 type (T).c4d
- 02 MA2B2 type (BT).c4d
- 03 MA2B2 type (SPC).c4d
- 04 MA2B2 type (SPT).c4d
- 05 MA2B2 type (BSP).c4d
- 06 MA2B2 type (OT).c4d
- 07 MA2B2 type (OC).c4d
- 08 M(A)3 type (BOC).c4d
- 09 MA2B4 type (OC).c4d
- 10 MA2B4 type (OT).c4d
- Editor - contains the editor tools for cineware and vuforia
- Lean - contains the lean touch library
- Materials -
contains the imported materials used by the models
- Arrow.mat - yellow
- Bond.mat - light gray
- Carbon.mat - dark gray
- Fluorine & Chlorine.mat - green
- Hydrogen.mat - white
- Metal.mat - gray
- Nitrogen.mat - blue
- Prefabs -
contains all the necessary prefabs
- 01 Instance.prefab
- 01 Root.prefab
- 02 Instance.prefab
- 02 Root.prefab
- 03 Instance.prefab
- 03 Root.prefab
- 04 Instance.prefab
- 04 Root.prefab
- 05 Instance.prefab
- 05 Root.prefab
- 06 Instance.prefab
- 06 Root.prefab
- 07 Instance.prefab
- 07 Root.prefab
- 08 Instance.prefab
- 08 Root.prefab
- 09 Instance.prefab
- 09 Root.prefab
- 10 Instance.prefab
- 10 Root.prefab
- Resources -
contains miscellaneous resources
- Image Targets -
contains all the image targets
- ImageTarget_01.png
- ImageTarget_02.png
- ImageTarget_03.png
- ImageTarget_04.png
- ImageTarget_05.png
- ImageTarget_06.png
- ImageTarget_07.png
- ImageTarget_08.png
- ImageTarget_09.png
- ImageTarget_10.png
- Scenes -
contains the unity scene
- App.unity
- Targeter -
contains the targeter assets
- Targeter.mat
- Targeter.png
- Targeter.prefab
- icon.jpg
- icon2.jpg - an alternate icon design
- VuforiaConfiguration.asset - the config file for Vuforia
- Image Targets -
contains all the image targets
- Scripts -
contains all the C# scripts
- AutoExpandingContainer.cs - custom script for fixing UI values on runtime
- CameraFocusController.cs - starts the phone camera autofocus when vuforia is active
- GlobalToggle.cs - custom script to handle toggles
- ImageTargetController.cs - custom script to control the application
- LeanDragTranslateEdited.cs - drag script from Lean Touch customised to fit the project
- LeanTwistRotateAxis.cs - twist script from Lean Touch with the rotation axis locked
- Streaming Assets - contains essential files for Vuforia
Documentation 🗗
The following sections contain detailed documentation and workflows for the project.
⚠ Work in progress
This section is still a work in progress!
Image Target Controller 🗗
This script connects the different parts of the app together.
It was created to make it simpler to execute repetitive tasks on active objects procedurally, which means that placing an object in the hierarchy would automatically be logged as a new object and executed on accordingly. In a beta version, all the scripts were manually attached, which meant that adding new models to the app was a chore.
The script was expanded upon in the later versions of the app to include a custom Vuforia API and handle the toggle button.
Finding and Tagging
Everything the script needs is found on runtime, tagged with an appropriate tag, and put into arrays.
// put the tagged models into arrays
arrayRoot = GameObject.FindGameObjectsWithTag("Root");
arrayInst = GameObject.FindGameObjectsWithTag("Instance");
Initializing
Now that everything important are in arrays, initializing scripts can thus be done procedurally on the hierarchy. The touch control scripts are distributed to the root models and the instances are disabled.
// init root
foreach (GameObject goRoot in arrayRoot) {
	if (goRoot.activeSelf) {
		goRoot.AddComponent<Lean.Touch.LeanDragTranslateEdited>();
		goRoot.AddComponent<Lean.Touch.LeanTwistRotateAxis>();
	}
}

// init instances
foreach (GameObject goInst in arrayInst) {
	if (goInst.activeSelf) {
		goInst.SetActive(false);
	}
}
Custom Vuforia API
Vuforia's documentation and api reference was a challenge to read and understand. We decided to check some of the main scripts instead and discovered that Vuforia disables untracked models by disabling the gameobject's renderer component. This quirk was used to find out if an object is tracked or not.
A method was also attached to each image target gameobject which runs it when the camera finds and loses a target. It's a hassle to add these to each image target but it removed the need for the script to constantly check if the object has changed its tracking status.
Finding
Firstly we gather all the renderers and put it into an array. Finding the instance this way is preferred over using the existing array in case the instance array is not in the same order as the root array or missing a value.
// find the root's instance
GameObject goInst = goRoot.transform.parent.GetChild(1).gameObject;

// get the instance's renderers
Renderer[] rendComp = goRoot.GetComponentsInChildren(true);
Check for rendered models
A simple check can then be done on the array of renderers and as long as the first one returns true, we execute all the necessary scripts.
// look for rendered models
if (rendComp[0].enabled) {
	...
}
Reset position and rotation
The active root and instance are repositioned using the two ResetPosRot methods.
// reset root and instance
ResetPosRot__Root(goRoot);
ResetPosRot__Inst(goInst);
Store active elements in list
The root is put in a list so that the toggle button will only affect the rendered elements. The list is handled using a separate method so that the check for rendered models will not run every time the button is pressed.
// put in list
listRend.Add(goRoot);
Positional and Rotational Resets
The user is given the freedom to move the model anywhere. The model's position is saved if the target is lost and found, which might put the model in a location that cannot be seen. This problem is solved by simply resetting the position to the app's defaults when the tracking status changes.
Resetting the root
Nothing complicated here, just a zeroed out quaternion and a Vector3 with the intended height the model should be at.
// reset to defaults
go.transform.localPosition = new Vector3(0.0f, 0.35f, 0.0f);
go.transform.localRotation = new Quaternion(0.0f, 0.0f, 0.0f, 1.0f);
Resetting the instance
This also has a zeroed out quaternion and a slightly different Vector3 with the intended position the model should be at.
// reset to defaults
go.transform.localPosition = new Vector3(0.0f, 0.35f, -0.2f);
go.transform.localRotation = new Quaternion(0.0f, 0.0f, 0.0f, 1.0f);
Toggle Mirror Image Button
The user is able to enable or disable the mirror image of the rendered element using a toggle button on the UI. The method is attached directly to the button and runs once when the button is tapped.
Execute on list
The rendered models have been saved in a list previously, thus removing the need for a second check.
foreach (GameObject goRoot in listRend) {
	...
}
Check button state
The state of the button describes the next action the app takes.
if (toggleMirrorImage.isOn) {
	...
}
Enable
If the button is set to its on state, the instance will be enabled, the root's position reset, and the touch control scripts will be transferred from the root to the instance.
// set instance to active
goInst.SetActive(true);

// reset root
ResetPosRot__Root(goRoot);

// remove scripts from root
if (goRoot.GetComponent<Lean.Touch.LeanDragTranslateEdited>() != null) {
	Destroy(goRoot.GetComponent<Lean.Touch.LeanDragTranslateEdited>());
}

if (goRoot.GetComponent<Lean.Touch.LeanTwistRotateAxis>() != null) {
	Destroy(goRoot.GetComponent<Lean.Touch.LeanTwistRotateAxis>());
}

// add scripts to instance
if (goInst.GetComponent<Lean.Touch.LeanDragTranslateEdited>() == null) {
	goInst.AddComponent<Lean.Touch.LeanDragTranslateEdited>();
}

if (goInst.GetComponent<Lean.Touch.LeanTwistRotateAxis>() == null) {
	goInst.AddComponent<Lean.Touch.LeanTwistRotateAxis>();
}
Disable
If the button is set to its off state, the instance will be disabled, the instance's position reset, and the touch control scripts will be transferred from the instance back to the root.
// set instance to inactive
goInst.SetActive(false);

// reset instance
ResetPosRot__Inst(goInst);

// remove scripts from instance
if (goInst.GetComponent<Lean.Touch.LeanDragTranslateEdited>() != null) {
	Destroy(goInst.GetComponent<Lean.Touch.LeanDragTranslateEdited>());
}

if (goInst.GetComponent<Lean.Touch.LeanTwistRotateAxis>() != null) {
	Destroy(goInst.GetComponent<Lean.Touch.LeanTwistRotateAxis>());
}

// add scripts to root
if (goRoot.GetComponent<Lean.Touch.LeanDragTranslateEdited>() == null) {
	goRoot.AddComponent<Lean.Touch.LeanDragTranslateEdited>();
}

if (goRoot.GetComponent<Lean.Touch.LeanTwistRotateAxis>() == null) {
	goRoot.AddComponent<Lean.Touch.LeanTwistRotateAxis>();
}
Molecule Builder 🗗
This XPresso package trivializes the modelling process.
Modelling all the molecules individually would have taken a week or two between the two of us, not to mention requiring some sort of style guide to ensure that both sets of models will be up to the same standard. This XPresso package solves both these problems by procedurally placing the bonds and automatically naming, texturing, and resizing the elements using a dropdown menu. The only thing that had to be done was to place the elements in the right position in 3D space, which was finished in a few hours by one person.
Element Rig
The rig removes the need for texturing and renaming of the objects. Everything is handled automatically by XPresso.
A fully expanded view of the XPresso window can be seen below.
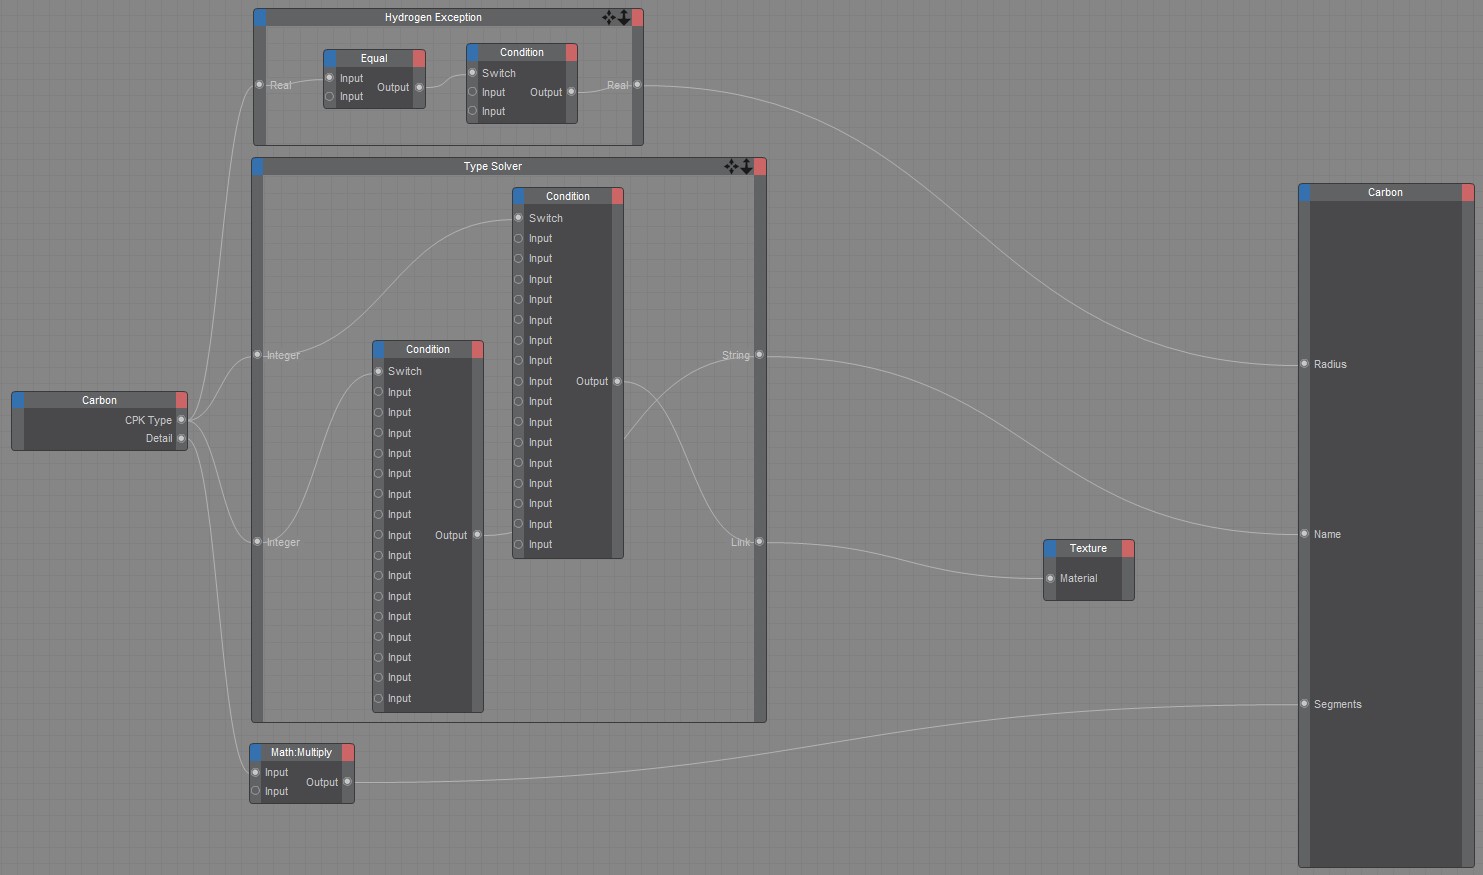
Hydrogen Exception
Hydrogen is usually depicted with smaller spheres, thus this portion of XPresso reduces the size of the sphere if hydrogen is selected as the element.
Type Solver
This portion of XPresso simply converts the numerical output from the dropdown list into names and textures for the elements. The elements can be set by selecting what CPK type it should be in the user data. The detail increases or decreases the number of polygons if lag is an issue.
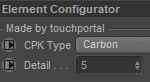
The settings above produces a result that looks like this in the hierarchy. Note the element name and black texture, which were set using the dropdown list.

Chemical Bond Rig
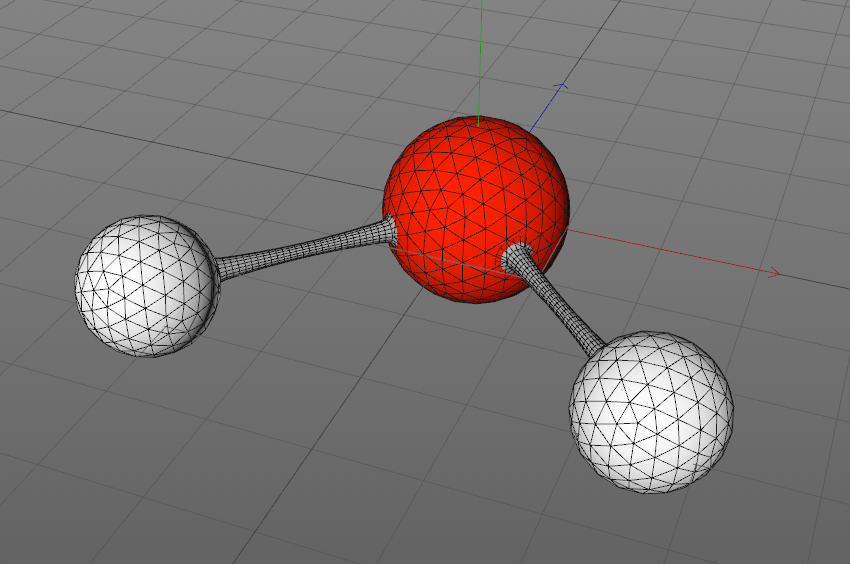
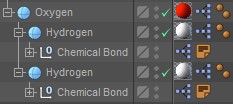
The demo has a pre-built H₂O molecule showcasing two bonds being attached to the same molecule.
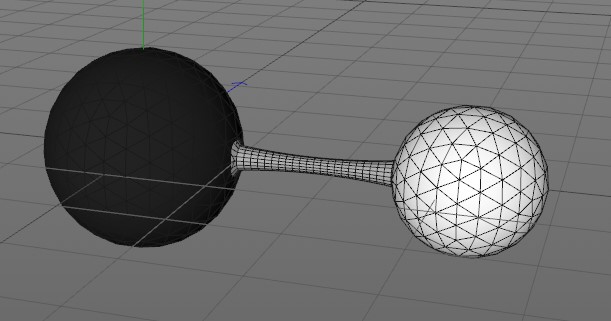
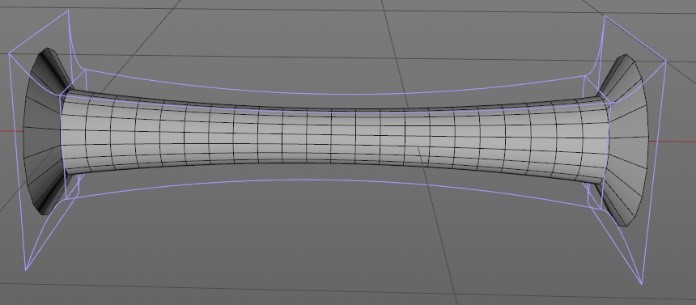
This is what the isolated bond looks like with the bulge and taper modifiers visible.
This is what the object hierarchy looks like in Cinema 4D.
Image
Text
-
Object Hierarchy
-
Oxygen
-
Hydrogen
- Chemical Bond
-
Hydrogen
- Chemical Bond
-
Hydrogen
-
Oxygen
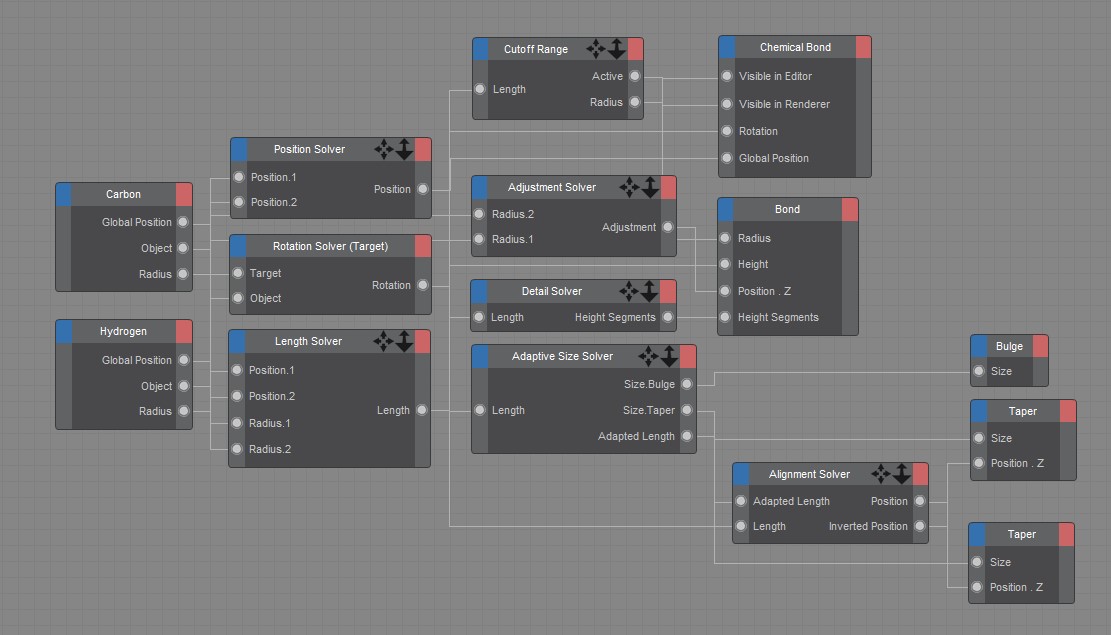
A fully expanded view of the XPresso window can be seen below.
Position Solver
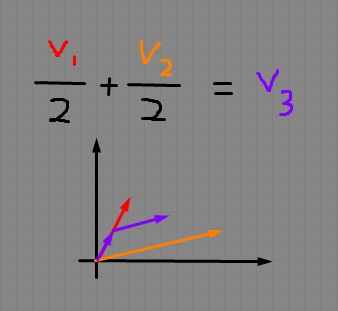
The position solver does some vector math to get the position between the two elements as shown in the image below. It takes two position inputs and returns a position between them.
v₁ and v₂ refers to the first and second element in the hierarchy respectively.
v₃ is depicted with two arrows, showing the addition of the halves of v₁ and v₂
Rotation Solver
The rotation solver is using a preset target node which points the chemical bond at a target. It takes two object inputs and returns a vector pointing the object at the target.
Length Solver
The length solver uses a preset distance node to calculate the distance between the two atoms. Removing both the atoms’ radii from the calculated distance will ensure that the chemical bond is tangent to the surface of both the atoms. It takes two object inputs and two radius inputs, and returns the length between the nearest points on two spheres.

The other solvers
The cutoff range prevents bonds from being visible if they are stretched past its limit. It also makes the bond look thinner when it is stretched out as a visual indication.
The detail solver sets the segments at a constant size so that the bond will always have the same level of detail no matter the length.
The adjustment solver accounts for the difference in size of the hydrogen atom as compared to the other elements. It is designed to work with any custom atom size if need be.
The adaptive size solver and alignment solver works in tandem to place the taper and bulge effects relative to the bond. This gives the bonds a little more detail instead of settling for a plain cylinder.
AR Code Generator 🗗
This XPresso script makes generating new AR codes a breeze.
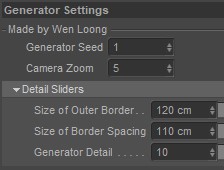
Making all these by hand would be too time-consuming. The script takes advantage of Cinema 4D's cloner modifier and allows the AR code to be seeded.
Project View
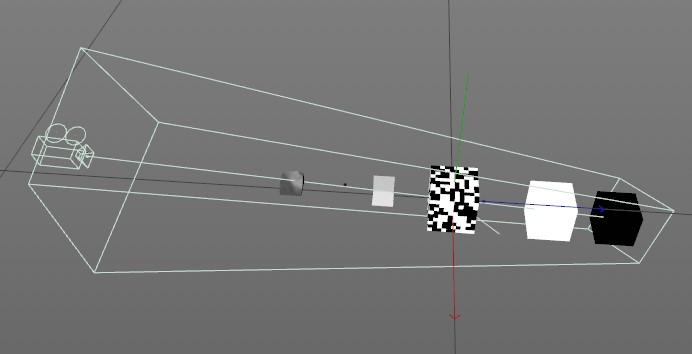
The rig uses a parallel camera to flatten the 3D models into a 2D image.
From left to right: parallel camera, template logo/icon, shaded icon border, image code randomizer, inner border, outer border.
Final Render
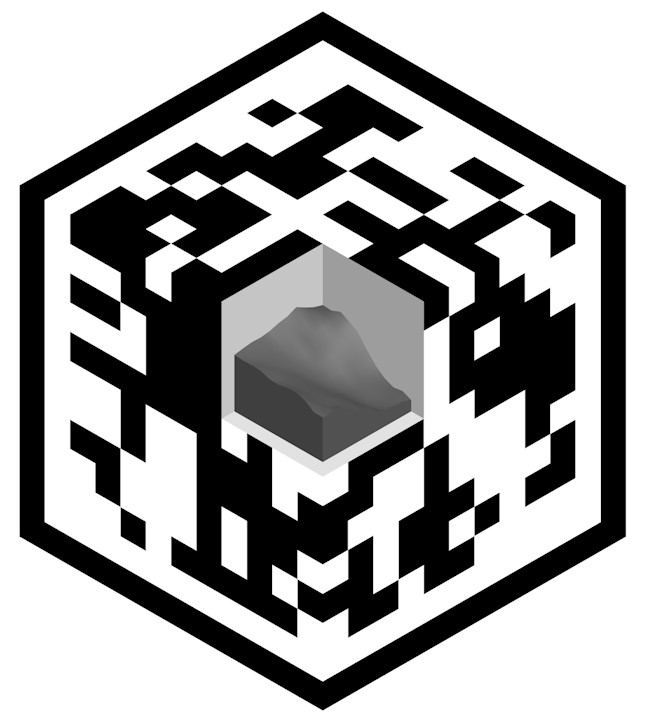
The seeds are limited to 1 through 10000. This render shows seed 0, which is designated as a test/showcase code and is unobtainable unless the userdata or the XPresso code is edited.
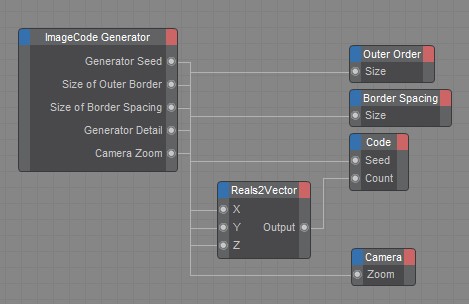
A fully expanded view of the XPresso window can be seen below.
The app was successfully developed, fulfilling all the initial criteria and included even more. Our client was extremely pleased with the results and the feedback from the closed group of testers were positive.
The team believes that more testing would push the app further, which is a sentiment the client and testers share. However the app was developed during the COVID-19 period where testing required a tedious planning process and was time-consuming in general.
All in all, the project was a success!